


Introduction
Windows 11 is a popular operating system with several features and functionalities. Users may, however, face glitches and problems from time to time.
Are you experience the error message “we can’t find your camera” while attempting to use the camera using the Camera app? You can phase this error with this number A00F4244. It means that the app couldn’t find any cameras on your Devices(PC/Laptop/Desktop).
The “We Can’t Find Your Camera” problem is one such typical mistake, which can be irritating when you’re attempting to utilize your camera for video chats, online meetings, or shooting photographs. This post will look at several practical strategies for resolving this problem on Windows 11.
What is the “We Can’t Find Your Camera” Error
The “We Can’t Find Your Camera” error typically occurs when your computer fails to detect or access the connected camera.
This can be caused by a number of factors, including outdated drivers, privacy settings, incompatible programs, or hardware problems. You can overcome this issue by following the troubleshooting procedures shown below.
Check Camera Hardware
Before getting into software-related options, make sure your camera hardware is in good working order. Verify that your camera is correctly linked to your PC.
If you’re using an external camera, be sure it’s securely attached through USB or another suitable connector. Make sure that any built-in cameras are not physically destroyed.
How to Check Camera Hardware
If you Want to fix “We Can’t Find Your Camera” error in your pc, Followings steps should you try for the first time:
- To open the Start menu, press the Windows key on your keyboard or click on the Windows icon in the taskbar.
- Enter “Device Manager” into the search bar and select the “Device Manager” app from the search results. The Device Manager window will appear.
- Locate and expand the “Cameras” or “Imaging devices” category in the Device Manager window. This will display a list of cameras or imaging devices that are connected to your computer.
- In the expanded category, you will find the camera(s). Look for the camera you want to test.
- If there is a problem with the camera, you may see a yellow triangle icon with an exclamation mark next to it, indicating a driver or hardware issue.
- If there are no issues, the camera should be listed without any error icons.
Update Camera Drivers
Outdated or incompatible camera drivers can often cause issues with camera detection. To fix this, update your camera drivers to the latest version. You can do this by following these steps:

- Press Windows Key + X and select “Device Manager.”
- Expand the “Cameras” or “Imaging devices” category.
- Right-click on your camera and choose “Update driver.”
- Select the option to automatically search for updated driver software.
- Wait for the process to complete and restart your computer if prompted.
Allow Camera Access in Privacy Settings
In the Windows 11 includes privacy settings that control which apps can access your camera. If the camera access is disabled for certain apps, it can result in the “We Can’t Find Your Camera” error. To enable camera access, follow these steps:
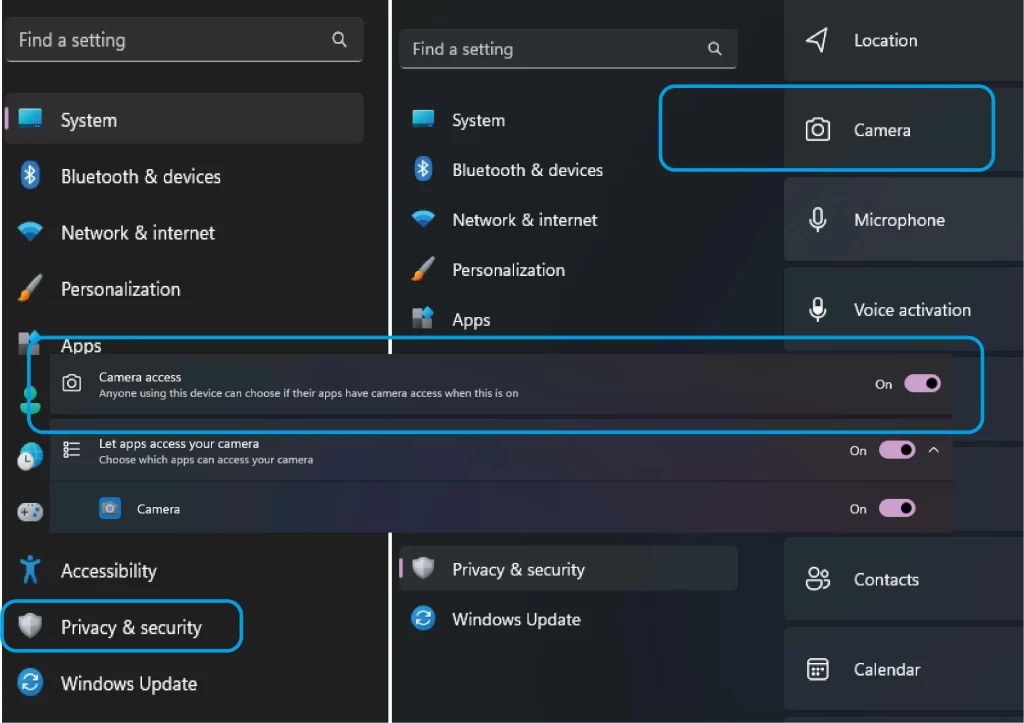
- Go to “Settings” by pressing Windows Key + I.
- Click on “Privacy” and select “Camera” from the left menu.
- Ensure that the toggle switch under “Allow apps to access your camera” is turned on.
- Scroll down and make sure the toggle switches for specific apps are also enabled.
Disable Third-Party Camera Apps
Sometimes, third-party camera apps or software can interfere with the functionality of the built-in camera. Temporarily disabling such apps can help identify if they are causing the error of “We Can’t Find Your Camera” .
To disable third-party camera apps, follow these steps:
- Close all camera-related apps.
- Right-click on the taskbar and select “Task Manager.”
- In the “Processes” tab, look for any camera-related processes or apps.
- Right-click on them and choose “End Task” or “End Process Tree.”
- After disabling the apps, try using the camera again to see if the error persists.
Run Hardware Troubleshooter
Windows 11 provides a built-in hardware troubleshooter that can detect and fix common hardware-related issues.
Running the hardware troubleshooter may help in resolving the camera error.
Follow these steps to run the hardware troubleshooter:
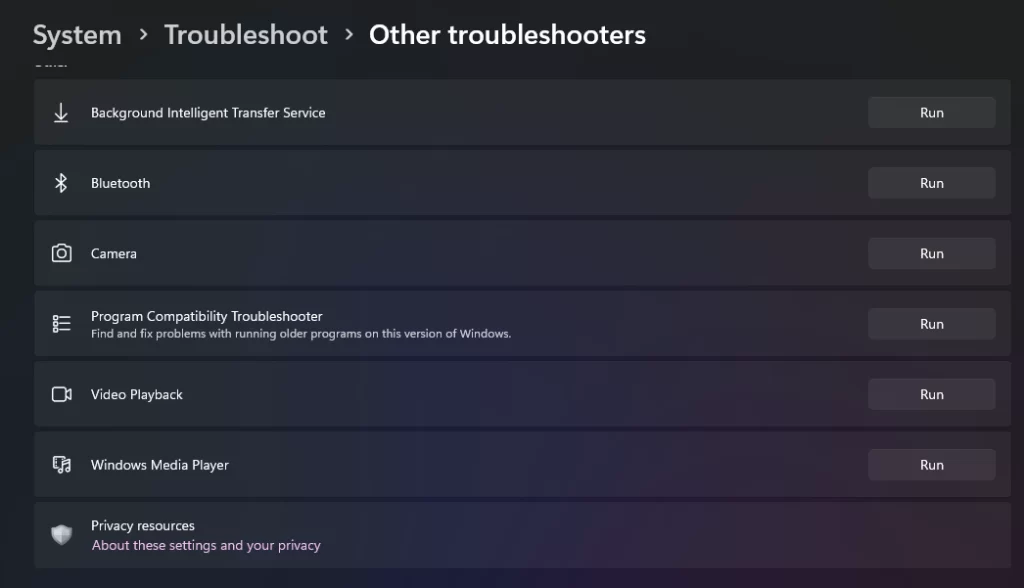
Click Run
- Press Windows Key + I to open “Settings.”
- Click on “System” and select “Troubleshoot” from the left menu.
- Under “Find and fix other problems,” click on “Hardware and Devices.“
- Click on “Run the troubleshooter” and follow the on-screen instructions.
Read More: QA and QC Engineer
Reset Camera App
If the camera app is misconfigured or has encountered a glitch, resetting it can help resolve the error. To reset the camera app, follow these steps:
- Press Windows Key + I to open “Settings.”
- Click on “Apps” and select “Apps & features” from the left menu.
- Scroll down and locate the camera app from the list.
- Click on the app, and then click on “Advanced options.”
- In the advanced settings, click on “Reset” and confirm the action.
Update Windows 11
Keeping your operating system up to date is crucial for optimal performance and bug fixes. Microsoft regularly releases updates that address various system issues, including camera-related errors. To update Windows 11, follow these steps:
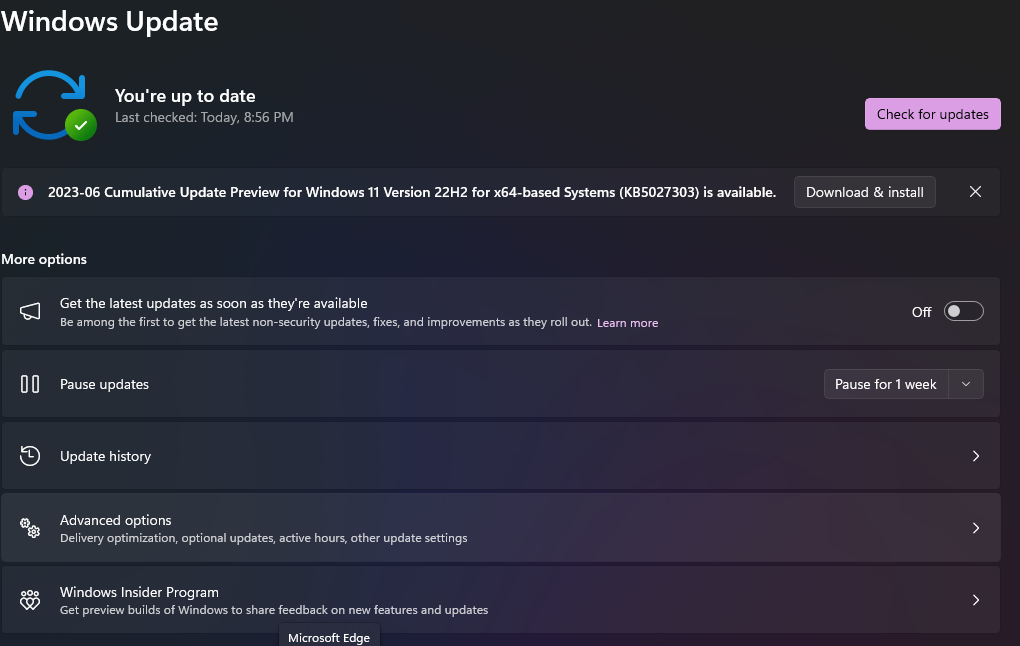
- Press Windows Key + I to open “Settings.”
- Click on “Windows Update” and select “Check for updates.”
- If updates are available, click on “Download” and “Install” to update your system.
- Restart your computer if prompted.
Perform a System Restore
If none of the options listed above have worked, executing a system restore may be a possible option. You can use system restore to return your computer to a prior state when the camera was working properly.
Here’s how to execute a system restore in Windows 11:
- Press Windows Key + R to open the Run dialog box.
- Type “rstrui” and press Enter to open the System Restore window.
- Follow the on-screen instructions to choose a restore point and initiate the restoration process.
- After the system is restored, check if the camera error has been resolved.
Conclusion
The “We Can’t Find Your Camera” error on Windows 11 can be irritating but by following the troubleshooting procedures outlined in this article, you should be able to resolve the problem and restore camera functionality. Check camera hardware, update drivers, alter privacy settings, and try the other remedies listed above. You may resolve the camera problem and continue using your camera on Windows 11 by following these instructions.